At first glance it might seem that I am just a happy, normal girl who loves to bake and walk her dog. However, I have suffered with an eating disorder since I was 13. It was only in May 2014 when I realised that this Voice in my head was slowly but surely trying to kill me. And so began the long, hard, and painful journey which is recovery...

I want My Cocoa Stained Apron to be a special place...a place for reflection, memories, shared stories...and of course a little bit of cocoa-staining ;) Recovery might be the hardest thing you ever choose to do in this life. But it is also the bravest and best decision you will ever make.:)

Showing posts with label buttercream. Show all posts

Friday, 19 December 2014

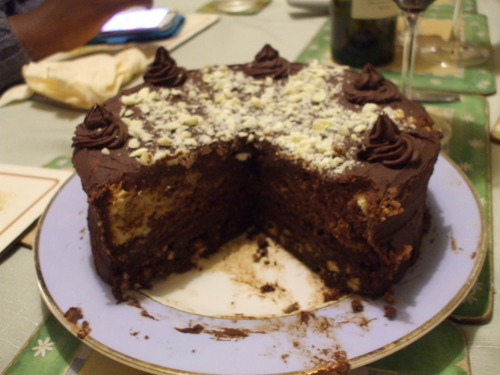
The TRIPLE decker!!! :)

Ahem....yes, this was SUPPOSED to be that holly leaf sponge which I was crowing about making in my Christmas baking post. Well...I do have a good explanation for why I ended up rustling it these gi-normous cake concoction instead of my intended project.Yesterday it was raining so hard that even creeping outside to the little holly tree growing on the lane was an exertion which just required too much effort for the pyjama-wearing Ganache-Elf. Typical Irish Christmas...rain instead of snow. :p


I PROMISE I will get onto the holly-leaf sponge - or something slightly reminiscent of that - in good time!! But as is often the case with my unintended creations....was I banging myself on the head with my wooden spoon in frustration as I regarded my result? Certainly not. ;)

This is another take on my biscuit cake sponge (click HERE for the recipe ;) )....though there are a few changes and little differences. The most obvious one though has to be the size of this more recent creation of mine. It's a three layer MONSTER of a cake sandwiched together with lots of - wait for it - not ganache but a chocolatey, scrummy buttercream instead. Also, I sneaked a few chocolate digestives into the biscuit cake for even more naughty chocolatiness. ;)

For the fluffy chocolate sponge. :)
  • 225 g margarine/butter, softened
  • 225 g caster sugar
  • 200 g self-raising flour
  • 25g cocoa powder
  • 4 large eggs
  • 2 tsp baking powder
  • 1-3 tbsp full-fat milk
For the biscuit cake. :)


  • 150 g digestive biscuits
  • 75 g milk chocolate digestive biscuits
  • 3 tbsp golden syrup
  • 150 g plain chocolate, chopped
  • 150 g butter/margarine, cubed
  • 25 g maltesers
For the creamy chocolate buttercream :)
  • 150 g butter, cubed
  • 350 g icing sugar
  • 2 tbsp cocoa powder
  • 2-4 tbsp single cream/milk
Method :)

  1. Make the sponge first: preheat the oven to 180 c/fan oven 160 c. Grease two 20 cm sandwich tins and line the bases with baking paper.
  2. measure the butter/margarine into a large bowl and beat with an electric mixer until very soft.
  3. Add the eggs, the caster sugar, the flour, the baking powder to the softened butter and then sieve in the cocoa. Mix well with an electric mixer for about 2 minutes; before pausing the mixer and scaping down the sides of the bowl with a large metal spoon. Resume mixing for another minute until smooth and well-blended.  
  4. Spoon up some of the batter and let it fall back into the bowl to check it is of a nice, soft, dropping consistency. Add 1 - 3 tbsp of milk, a tbsp at a time, if it seems a little on the thick side. 
  5. Divide the batter equally amongst the two tins and smooth the surface with the back of a spoon.
  6. Bake for 25 – 30 minutes in the preheated oven until the sponges are well-risen and spring back beneath the fingertip when pressed gently on the top. If an indent is left when you do this, bake for a few minutes more before testing again.
  7. Leave in the tin for a few minutes before turning out onto a wire rack, peeling off the paper and leaving to cool.

  1. Next make the biscuit cake: take one of the very same cake tin that you used for your sponge and line this well with cling film. Crush the digestives  in a freezer bag with a rolling pin.
  2. Put the plain chocolate, the butter, and the golden syrup into a large saucepan, using a heated spoon to measure out the syrup as this makes it easier to handle.
  3. Melt the contents of the pan over a very gentle heat, stirring occasionally until melted and smooth, and then remove from the heat.
  4. Cool a little before stirring in the biscuit crumbs, and then mix in the maltesers. Transfer to the prepared tin and refrigerate until set.

  1. Now it's time to assemble your gorgeous cake. :) Place one of the cooled sponges on a plate. 
  2. Make the chocolate buttercream by beating the 150 g butter with a wooden spoon or electirc mixer. Then sift in the icing sugar and the cocoa powder. Add the tablespoons of cream as required and continue to beat until you have a nice spreadable icing.
  3. Spread a little buttercream over the top of the sponge on the plate. Remove the biscuit cake from the tin, and then place it on top of the sponge.
  4. Cover the top of the biscuit cake with another layer of buttercream, and then place the other sponge on top of it.
  5. And then FINALLY....one more layer of buttercream!! :) And use any reserve buttercream to decorate your cake: As you can see from the pic, I piped little swirls on the top of my cake using an icing bag fitted with a fluted nozzle, and also piped around the edges and sides. :)


Saturday, 4 October 2014

little chocolate sponges. :)

image
image

No matter what the time of year or the occasion, cakes are just never going to go out of fashion…everyone loves them, and the hundreds of different varieties and flavours out there mean that making your own cakes is rewarding, exciting, and an immense joy in itself. But I’ve often found, especially recently what with my sis and bro not being here, that sometimes making a big cake is just not economical...and what could be possibly worse, than having to throw away ANY of your lovingly-made, formally yummy gateau, due to sogginess, staleness, or cream-gone-past-its-sell-by-date-ness, etc. But there are ways around this dilemma of course. Cupcakes and buns being the most obvious answer. Though I am quite proud of these little creations of mine: for they are, quite literally, miniature versions of the wonderful, classical sponge cake. A light chocolate sponge sandwiched together with creamy vanilla buttercream, and then topped with milk chocolate ganache...but they're only about the size of a teacup, and irresistibly cute too may I add. :)

For the chocolate sponge. J
·         110 g margarine/butter, softened
·         110 g caster sugar
·          2 large eggs
·         Few drops milk/cream
·         25 g cocoa powder
·         90 g self-raising flour
For the filling/icing.
·         100 g milk chocolate, broken into pieces
·         60 ml single cream, plus a little extra for the buttercream
·         110 g icing sugar
·         50 g butter, softened
·         ½ tsp vanilla essence/extract
·         Extra icing sugar for dusting
Method. J
1.      For the chocolate sponge: Preheat oven to 180 c/fan 160c. Grease and line a Swiss roll tin (mine measures about 25cm x 36cm, and is about 2 cm deep) with baking paper.
2.      Sift the cocoa powder into a large bowl and add the eggs, flour, caster sugar, and the softened margarine/butter. Beat well with an electric food mixer for about 2-3 minutes until smooth and well-blended. Scrape down the sides of the bowl with a plastic spatula or large metal spoon halfway through the mixing so that it’s all nicely incorporated.:)
3.      Scoop up a spoonful of the mixture with your spoon and let it fall back into the bowl; it should be of a nice soft dropping consistency and slide easily back off the utensil into the bowl. Add a few drops of milk or cream to achieve this if it’s not quite right. J
4.      Spoon the mixture into the prepared tin and spread out with your spoon evenly. Smooth the top with the back of the spoon. Place in the oven and bake for 10 -15 minutes. The cooked cake should be risen and spongey to the touch; it should spring back beneath your fingertip when lightly pressed.
5.      Wait for about a minute, then gently tip the sponge out of the tin onto a wire rack to cool, peeling off the paper when it’s out the tin. Leave to cool completely.
6.      When the sponge is cold, gently move it onto a clean work surface. Use a  8cm pastry cutter to stamp out neat circles. Try and do this so that you have an even number of circles and that as little sponge as possible is wasted.
7.      Make the milk choc ganache next: gently heat the 60 ml single cream in a small saucepan over a low-medium heat and slowly bring to the boil. As soon as the bubbles appear remove from the heat and add the broken up milk chocolate. Leave for about 5 minutes and then stir together until smooth.
8.      Chill the ganache for about an hour until it is of a nice spreadable consistency.
9.      Make the vanilla buttercream: beat the butter in a big bowl until very soft, then add the icing sugar, the vanilla and a few drops of cream/milk. Continue to beat until you have a spreadable icing.
Using a piping bag fitted with a fluted nozzle, cover half of the sponge circles with swirls of buttercream. Reserve a little though for decoration. Top with the remaining sponge circles.
Spread the milk chocolate ganache neatly over the tops of the cakes.
Pipe around the edges of the tops of the cakes and then dust with icing sugar for a pretty finish.
Note. Of course, feel free to use different fillings/icings then the ones I used above. You might like to fill them with jam or whipped cream perhaps, and sprinkle on some granulated sugar on top; or fill and top them with white, dark or milk chocolate ganache, or chocolate buttercream... well as I said so before, when it comes to cake-baking, there are endless possibilities. And even if you are making cakes of much smaller dimensions, that doesn't mean that the your decorating/icing options have shrunk as well after all. ;)

Wednesday, 20 August 2014

Is it a biscuit cake? Is it a sponge? Well, no...it's both, actually. ;)


image
Now I must say, for some of the recipes on My Cocoa Stained Apron, I can’t claim them entirely as my own creations…for I got the idea off other recipes and made my own little changes and alterations to suit myself. BUT this is not the case with the cake above. I attempted to come up with some really awesome name for it, but I’m afraid I failed in that. And so it is simply named, somewhat boringly, as Ganache-Elf’s Biscuit Cake Sponge. Oh well, perhaps the name isn’t exactly brilliant, but that doesn’t take anything away from the cake itself, of course. You see before you cut into it anyone would think it is just an ordinary chocolate cake…but, hidden beneath all that lovely ganache lies two layers of two very different types of cake. One being, a scrumptiously light, enticingly crumbly chocolate and vanilla marbled sponge; the pretty yellow and brown shades complementing eachother beautifully and meaning that the sponge looks just as yummy as it tastes. And on the bottom…a very,very chocolatey biscuit cake layer, its crunchy, dense chocolatiness contrasting enticingly with the seductive softness of the sponge. Need I say any more…
Perhaps it is rather silly of me to reveal my “secret” recipe for the whole blogging world to see, but I don’t think, really, it would be morally right to keep it to myself. Anyway, for all I know, there are already lots of intrepid bakers out ther who have already had the very good idea of bringing together two of our most best-loved and utterly delicious cake types. But anyway, just in case you are not one of those people, and would be very, very interested in trying it out for yourself, here is the recipe. (Note…in the recipe below I made both ganache and buttercream…but it’s up to you whichever you use, really. You might want to use both or just one of each, or perhaps different flavours of buttercream or different flavours of ganache…etc. I leave that to your very capable imaginations ;)
Ganache-Elf’s Biscuit Cake Sponge. :)
Ingredients
For the sponge:
  • 110 g margarine/butter, softened
  • 110g caster sugar
  • 1 tsp baking powder
  • 110 g self-raising flour
  • 2 large eggs
  • 1 tbsp cocoa powder
  • 2 tsp milk
  • Few drops vanilla extract
  • Few drops pink or red food colouring
For the biscuit cake:
  • 150 g butter, cubed
  • 150 g plain chocolate, broken up
  • 3 large tbsp golden syrup
  • 150 g digestive biscuits
  • 75 g rich tea biscuits
  • 25 g marshmallows, halved
  • 25 g Maltesers or other small chocolates, such as Smarties or Galaxy Minstrels
For the ganache:
  • 100 g plain chocolate, broken up
  • 100 ml cream
For the chocolate buttercream:
  • 75 g butter, softened
  • 175 g icing sugar
  • 1-2 tbsp cream or milk
  • 1 tbsp cocoa powder
Method:
  1. First, make the sponge. Preheat the oven to 180 c/fan oven 160 c. Grease a 20 cm sandwich cake tin and line the bottom with baking paper.
  2. Put the softened butter, the sugar, baking powder, flour and eggs into a bowl. Beat well with an electric mixer until smooth and well blended. Add a few drops of water, if necessary, to create a soft dropping consistency.
  3. Spoon a third of the mixture into a separate bowl, and another third into another bowl, leaving the remaining third in the original bowl. Into one bowl, sift the tablespoon of cocoa powder and gently fold in with 2 teaspoons of milk.
  4. Tint one of the other two mixtures in the remaining bowls pink/red with a few drops of food colouring. To the one remaining mixture, mix in a few drops of vanilla extract.
  5. Transfer large spoonfuls of each mixture into the prepared tin. Dot the spoonfuls alternatively around the tin until each mixture is used up completely. Then use a skewer to swirl around the surface of the uncooked sponge to create a pretty marbled effect.
  6. Bake for 20 – 30 minutes in the preheated oven until the sponge is well-risen and springs back beneath the fingertip when pressed gently on the top. If an indent is left when you do this, bake for a few minutes more before testing again.
  7. Leave in the tin for a few minutes before turning out onto a wire rack, peeling off the paper and leaving to cool.
  8. Next, make the biscuit cake: take the very same cake tin that you used for your sponge and line this well with cling film. Crush the digestives and the rich tea biscuits in a freezer bag with a rolling pin.
  9. Put the plain chocolate, the butter, and the golden syrup into a large saucepan, using a heated spoon to measure out the syrup as this makes it easier to handle.
  10. Melt the contents of the pan over a very gentle heat, stirring occasionally until melted and smooth, and then remove from the heat.
  11. Cool a little before stirring in the biscuit crumbs, and then mix in the marshmallows and the maltesers/smarties/minstrels. Transfer to the prepared tin and refrigerate until set.
  1. For the ganache, melt the plain chocolate together very gently with the cream in a saucepan, stirring occasionally until melted and smooth. Place in the fridge for about a couple of hours until not completely set, but of a nice spreadable consistency.
  2. To assemble the cake, place the set biscuit cake on a plate. Spread the ganache over the biscuit cake, reserving about a quarter for piping, and place the cooled sponge on top.
  3. Next make the chocolate buttercream. Beat the Kerrygold butter in a bowl until very soft, then sift in the icing sugar and the cocoa powder. Add the tablespoons of cream as required and continue to beat until you have a nice spreadable icing.
  4. Spread the buttercream over the top and sides of the cake, again reserving a small quantity for piping. Swirl the top with a palette knife to get a pretty decorative effect.
  5. Use an icing bag with a fluted nozzle to pipe alternative swirls of ganache and buttercream on the top of the cake.